Creating a Cloud Auto Attendant or Cloud Call Queue for both On-Premises and Teams Only Users

UPDATE 2/18/2020: Microsoft has removed the opt-in method for Cloud VM early access and has confirmed that all of Exchange UM Online will no longer be avaliable after Feb 28, 2020. If the user is homed in Skype for Business 2015 as of today, the user is routed on Microsoft’s end to Exchange Online UM. If the user is homed on Skype for Business 2019, the VM call is routed to Cloud Voicemail. If you move the user back or between pools, it uses whatever pool it is assigned to. After this change is made on the 28th, all calls will be routed to Cloud Voicemail regardless of the pool the user is homed on.
With Exchange Unified Messaging being removed from Exchange Online at the end of February 2020 and being already removed from Exchange Server 2019, organizations have to be actively planning a replacement for all Exchange UM Auto Attendants that is currently in use. This guide will explain what is required, how to configure Cloud Auto Attendants and Cloud Call Queues, and how to validate the newly created Cloud Auto Attendant(s) and/or Cloud Call Queue(s).
NOTE: This guide pertains primarily to organizations that are using Skype for Business Server on-premises with Exchange UM, not cloud-only customers.
This guide will be broken down into four main sections:
- Planning & Prerequisites
- Setup Process
- Testing & Validation
- Clean Up
Planning & Prerequisites
What is happening?
Exchange Online UM is to be turned off in February 2020 and after that, all Auto-Attendants will no longer work. Voicemail services that are currently provided by Exchange UM will be automatically migrated to the new Cloud Voicemail service, however, Auto Attendants need to be manually migrated. The goal of publishing this guide is to make users aware of Exchange Online UM’s impending doom and to push for the need of migrating to the new cloud services to prevent down-time for one’s organization. This guide will take an existing Exchange UM Auto Attendant, remove it from the environment and provide the steps to use a modern Cloud Auto Attendant.
In regards to Cloud Call Queues, there is no major need to migrate to the service if you are wanting to keep all existing users on-premises with Response Groups. Where they become extremely useful is for migrating users to Microsoft Teams as Cloud Call Queues can be used to dial both Microsoft Teams Users and Skype for Business Server/Online users.
Benefits of Cloud Auto Attendants and Cloud Call Queues
This is a cloud built application that works with both on-premises and cloud-based users
- Useful for organizations not moving to Microsoft Teams over-night and need to retain interop with both on-premises and cloud-based users
- No need to convert audio files to a single-channel WAV format
• Audio sounds a lot more crisp due to this
- If Teams Direct Routing is used, they are free as long as a single Phone System license is added to a Microsoft 365 Tenant.
Which features no longer exist?
A few features no longer exist in Cloud Auto Attendants/Cloud Call Queues that used to exist in Exchange UM Auto Attendants
- Direct Dialing of E.164 phone numbers (Coming Soon)
- Direct Dialing of Extensions (Coming Soon)
NOTE: Many other Exchange UM features no longer exist such as Subscriber Access, Fax, and more. These features do not pertain to Auto Attendants but pertain to Exchange UM.
Prerequisites
A few prerequisites need to be addressed before the resource accounts can be created.
• Skype for Business Server Software Version
- Skype for Business Server 2015 – CU8 or Higher (Current Version is CU12 HF1)
- Skype for Business Server 2019 – Any version (Current Version is CU6 HF1)
• Must have hybrid connectivity to Skype for Business Online
- Includes Azure AD Connect
• Licensing Requirements
- At least one Phone System license purchased (Included with a E5)
- Once at least one Phone System license is purchased, free Phone System – Virtual User licenses can be obtained
- Users must have a Small Business License with Business Voice, Enterprise E1 or E3 with an additional Phone System license, or E5 IF they are cloud based. If on-premises, no additional licensing is required
• Must have Microsoft Teams Direct Routing configured or a Cloud Calling Plan
- Refer to my Deploying Direct Routing for Microsoft Teams guide! – CLICK HERE
- NOTE: Not Required if staying with Skype for Business Server!!! SFB Server holds the user object and will be the first point of contact when dialing the user.
Setup Process
Step 1: Create an on-premises resource account
On a Skype for business Front-End Server or a Trusted Application Server, run the following PowerShell cmdlet but with using different variables. The Display Name is How the Auto Attendant or Cloud Call Queue will appear within the Skype for Business Client, the SIP Address is the SIP Address, and the OU is where the account is to be created. Make sure that this created in an OU that is part of the Azure AD Connect Sync Group.
SFB 2015:
New-CsHybridApplicationEndpoint -ApplicationId 41ec7d50-ba91-1208-73ee-136b88859725 -DisplayName RA1 -SipAddress sip:Ra1@domain.com -OU "ou=RA,dc=domain,dc=com" -LineURI "tel:+13305550001"SFB 2019:
New-CsHybridApplicationEndpoint -DisplayName RA1 -SipAddress sip:Ra1@domain.com -OU "ou=RA,dc=domain,dc=com" -LineURI "tel:+13305550001"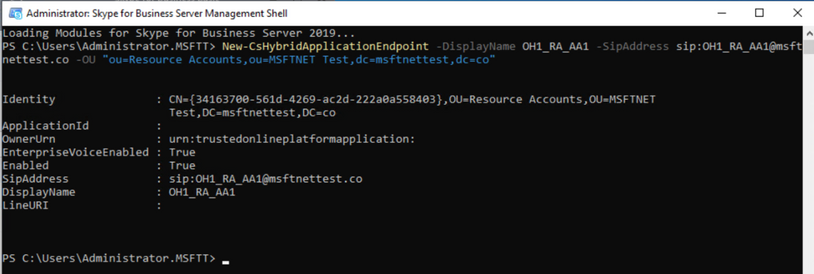
Step 2: Force sync the account to Azure AD (Optional)
To speed up the process of generating the online application instance and not wait up to 30 minutes, the newly created account can be force-synced to Azure AD. On the server that runs Azure AD Connect run the following two PowerShell cmdlets:
Import-Module ADSync
Start-ADSyncSyncCycle -PolicyType Delta
Step 3: Assign a Virtual Phone System License to the Resource Account
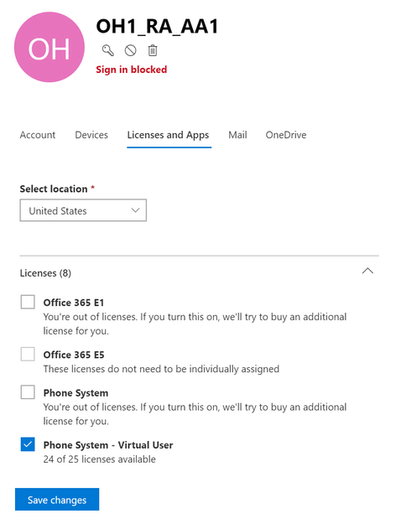
Now that the account exists in the cloud, a Phone System – Virtual User license needs to be assigned to the resource account.
1. Login to the Microsoft 365 Admin Center as a Global Administrator at https://portal.office.com
2. Click “Admin”, then “Users”, and then select the newly created Resource Account
3. Click on the “Licenses & Apps” tab, select the Phone System – Virtual User license and then click “Save Changes”
The Application Instance can take up to 24 hours to be created! Use the Get-CsOnlineApplicationInstance cmdlet to see if Microsoft 365 has created the instance or not.
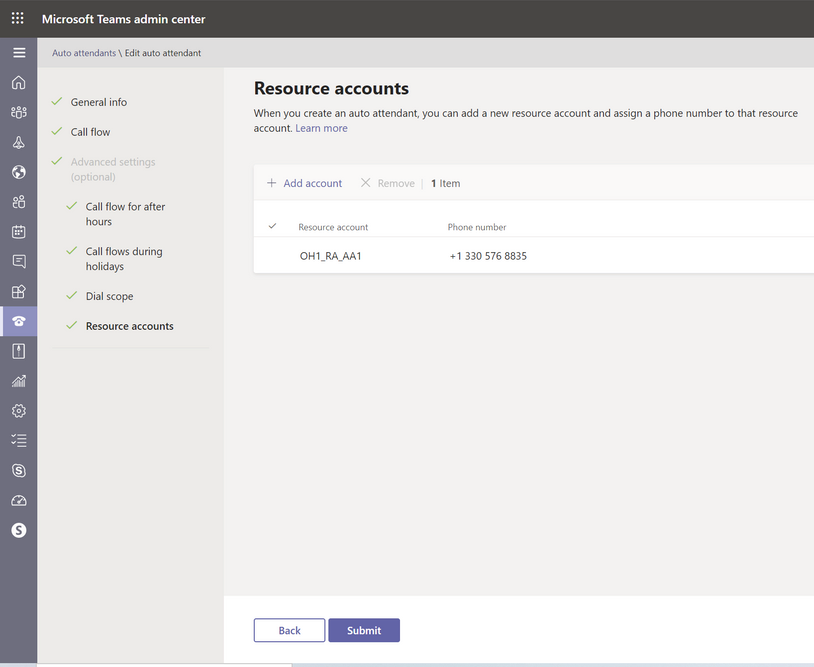
Step 4: Create a Cloud Auto-Attendant or Cloud Call Queue
Now that things are good to go from a resource account perspective, an auto-attendant or cloud call queue can be created. This guide will not cover the specifics of each, but when creating each, select the newly created resource account as show below:
Testing & Validation
With the Cloud Auto-Attendant(s) or Cloud Call Queue(s) created, functionality can be tested.
Call into each Auto Attendant and verify that:
- Any custom greeting(s)/automated messages play
- Voice commands work (If enabled)
- All menu options are pronounced correctly and can be reached
- Business hours work (If applicable)
Call into each Call Queue and verify that:
- Any custom greeting(s)/automated messages play
- The selected routing method works correctly
- All members on-premises and in the cloud are able to be reached
- Business hours work (If applicable)
Clean Up – Exchange UM
This section really only applies to organizations that have Skype for Business Server and have just created a replacement for their Exchange UM Auto-Attendant. The following steps need to be taken to remove the Exchange UM Contact in Skype for Business Server and remove the former AA from Exchange Server. This step has to be completed first if the same phone number is being reused or last if a new phone number is being used.
Step 1: Remove the Exchange UM Contact
On a Skype for business Front-End Server or a Trusted Application Server, run the following PowerShell cmdlets but by using different variables. First we need to identify the SIP address of the Exchange UM Contact that we wish to remove by using Get-CsExUmContact cmdlet. Once the SIP address has been identified, fill that in on the below cmdlet
Remove-CsExUmContact -Identity sip:OldExchangeUMAddress@msftnettest.co

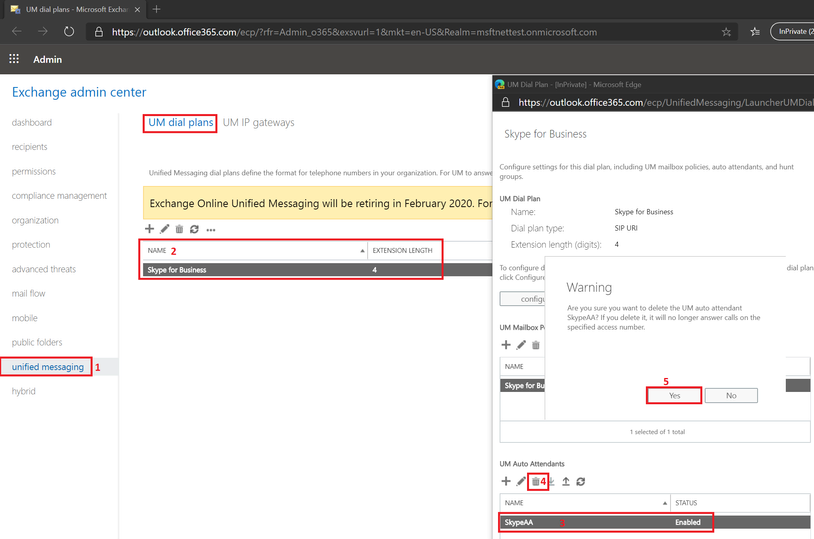
Step 2: Remove the Auto Attendant from Exchange Online
In the Exchange Online Admin Center, click Unified Messaging > The UM Dial Plan > Single Click the AA you wish to remove > Click the Trash Can > Confirm the Removal. Note that this step is optional
Clean Up – Response Groups
This section only applies to organizations that moved from a Response Group to a Cloud Call Queue. Remove the RGS Workflow, the Queue, and the Group from the Skype or Business CSCP Control Panel. This step has to be completed first if the same phone number is being reused or last if a new phone number is being used.
Special Thank You!
I want to give a special thank you to anynode for giving me a license to use their SBC for this guide. Be sure to check out their amazing product at https://www.anynode.de/
Feel free to reach out by commenting below if you have any questions!
Leave a Reply