Migrating from Skype for Business Server 2019 to Microsoft Teams: The Ultimate Guide

A lot of posts regarding the migration process from Skype for Business (SFB) to Microsoft Teams have been created online, however, these posts cover organizations that are only utilizing Skype for Business Online and not a Skype for Business Server deployment. This guides’ goal is to explain why one would want to, what is required to, and how to migrate from Skype for Business Server to Microsoft Teams.
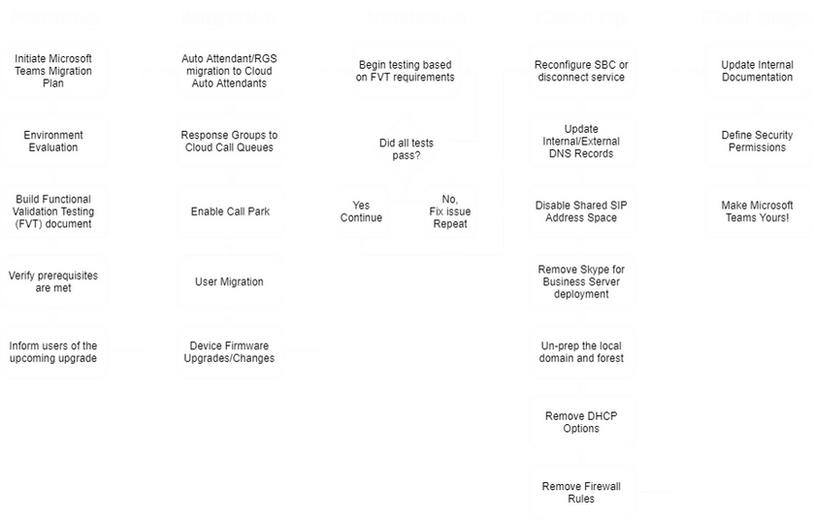
This guide will be broken down into five main sections:
- Planning & Prerequisites
- The Migration Process
- Testing & Validation
- Clean Up
- Troubleshooting
Planning & Prerequisites
Why Migrate?
This is one of the biggest questions that I see organizations asking when it comes to the topic of Microsoft Teams. Migrating away from Skype for Business Server can be a major change to the culture of an organization so evaluating these key points can help guide an organization if & when to migrate:
• Business Decisions
- Cost reduction comes two ways when an organization is fully leveraging Microsoft Teams. The first point of cost reduction is that an organization is able to leverage their existing investment in Microsoft 365 licensing instead of having to purchase additional licenses for key features. Another point to cost reduction is that infrastructure is no longer required on premises as Microsoft Teams is a Cloud-First solution.
• Skype for Business Server 2019 Software Support
- Skype for Business Server 2015 & 2019 will become end-of-life in October 2024. At that point, the products will become feature locked and they will not get any further security updates which can put organizations at risk. This is provided that no additional software versions are provided.
• Improved Mobile Client Experience
- The Microsoft Teams mobile app provides a fully functional interface that brings the full desktop client to a mobile app. This provides mobile and first-line workers more ways to work on-the-go without needing a PC to perform their tasks at hand.
Why to Not Migrate
Many organizations might want to know some cases in which they should not migrate to Microsoft Teams. 3 big reasons why one would not want to migrate are as follows:
• Investment in existing infrastructure
- An organization may have just completed a Skype for Business deployment and depending on the size of this deployment, there was probably a high cost associated with this. Holding on the migration might be needed so that the company can see a return on their investment.
• Feature Parity
- Some features from an enterprise voice perspective are just not as refined as they were in Skype for Business Server. At the time of writing, all voice manipulations must be done via PowerShell and normalization rules do not exist. These will be coming in future releases.
• End-User Devices
- An organization may have many Skype-only devices around. None of these devices will be supported in the long-run for Microsoft Teams (3PIP support till 2023) and organizations must purchase new native Teams devices (in the case of phones).
Evaluate Your Environment
A few questions need to be addressed and/or taken into consideration about an environment before the migration process can occur. These questions to ask are designed to assist in making sure that the process is a seamless migration.
• Where are your users homed?
• How large is the Skype for Business Deployment?
• Keep existing phone numbers on premises, port to Microsoft, or direct routing with a third-party?
• Exchange on-premises or in Microsoft 365
• Legacy device support (analog, generic SIP, fax)
• Network Assessment
- Is you network capable of handling Microsoft Teams?
• Functional Validation Testing (FVT)
- What you need for the Teams deployment to be successful?
- Define use cases and requirements – What does success look like for the organization?
- Complete testing list – Ex. Each menu option on an AA, calling to external numbers
Prerequisites
A few prerequisites need to be addressed before the migration can occur.
• Skype for Business Server Software Version
- Skype for Business Server 2015 – CU8 or Higher (Current Version is CU10 HF1)
- Skype for Business Server 2019 – Any version (Current Version is CU1 HF1)
• Must have hybrid connectivity to Skype for Business Online
• Users must have a Small Business License with Business Voice, Enterprise E3 with Phone System, or E5 to take advantage of Microsoft Teams Voice features
• Must have Microsoft Teams Direct Routing configured (If retaining SBC)
- Refer to my Deploying Direct Routing for Microsoft Teams guide! – CLICK HERE
What is Direct Routing and why should I care about it?
Direct Routing for Microsoft Teams expands the capabilities of the product, below features that it provides for customers:
• Interop with third-party systems
- Allows companies to migrate users in groups from one phone system to another and provides interop between them.
- Integrates with third-party PBXes, analog devices, and Microsoft Phone System.
• Leverage existing contracts with service providers
- Leveraging existing infrastructure would allow a much simpler migration path as the organizations do not have to migrate DIDs from one provider to another.
• Single DID for every user
- This can be provided in Teams with a Calling Plan, however, it would be cheaper with more users as $12 a month is a VERY high cost.
• Where calling plans are not available
- Calling plans are not available in certain countries so direct routing would allow users to leverage a local trunk.
• Can be combined with Calling Plans
- Some users can use a calling plan license, or they can use direct routing. This can be mixed within the organization.
- Perhaps after a migration away from another phone system and a local SBC is used, the company may want to remove the need for the SBC and another vendor. Numbers can then be ported over to Microsoft/Bandwidth.
• Less Hardware Footprint (Compared to Skype for Business)
- On-Prem servers for Cloud Connector Edition (CCE) is no longer required and only the SBC in a perimeter network is required
- Some organizations are deploying a software-based SBC in Azure to eliminate the need for any on prem infrastructure. (AnyNode)
Meetings Migration Service (MMS)
• MMS is a service that updates the online meeting information block for a user’s existing meeting when the following scenarios are triggered:
- When a user is migrated to the cloud from on-premises (To SFBO or TeamsOnly)
- When an administrator changes a user’s audio-conferencing settings
- When an online user is set to TeamsOnly or SfBwithTeamsCollabAndMeetings
- Via PowerShell with the “Start-CsExMeetingMigration” cmdlet
• Limitations
- The user’s mailbox is hosted in Exchange on-premises
- The user is being migrated from the SFB Online to SFB Server
• Note that this is only invoked when set per user, not on an organization level!
Will My desk phone continue to work with Microsoft Teams?
• Existing Skype for Business Certified Phones will continue to work*
- This is only with limited functionality
- 3PIP phone support will work until July 31, 2023
- Lync Phone Edition Devices will no longer work as of October 2019
• Consider Upgrading to Microsoft Teams Certified Phones
- Certain models will work with both Skype for Business and Teams
- Costly compared to some Skype for Business Phones
- A complete list of devices can be found at http://www.Aka.ms/teamsdevices
Coexistence Modes
Different coexistence modes exist for an organization to support the migration process to Microsoft Teams.

A few notes need to be taken regarding Coexistence Modes:
• Stay out of Islands mode!
- User confusion as messages in SFB route only to SFB and messages in Teams only route to Teams
- Recommended to use only for IT Testing
- Recommended to start with Collab or Collab/Meetings First for the organization
• Have a strong plan in place and limit your time in coexistence
• Will not trigger the Meetings Migration Service if set at the organization level
• Depending on the size of the organization change this at the user or organization level
Notifying On-Premises Users about the Migration
Users within the organization need to be informed about the upcoming changes to the organization. From a non-technical perspective, different events such as Device Road Shows, Training Sessions, Lunch and Learns, Ask the Experts, Intranet Messages, and/or posts on Yammer need to be done to prepare the users within the organization. While Coexistence Modes and SFB notifications can be set in the Teams Admin Center, changing this policy DOES NOT notify on-premises users. It only affects what features are available in Microsoft Teams.
• To alert on-premises users, run the following cmdlets:
• Create the Upgrade Policy
- New-CsTeamsUpgradePolicy -Identity EnableNotifications -NotifySfbUser $true
• Enable the automatic download of Teams (Optional – Set at Global, Site, or Pool Level)
- New-CsTeamsUpgradeConfiguration -Identity “site:MSFTT”
• Assign the Policy at the Global, Site, Pool, or User Level
- Grant-CsTeamsUpgradePolicy -Identity “site:MSFTT” -PolicyName EnableNotifications
- Grant-CsTeamsUpgradePolicy -Identity TestUser1@msftnettest.co -PolicyName EnableNotifications
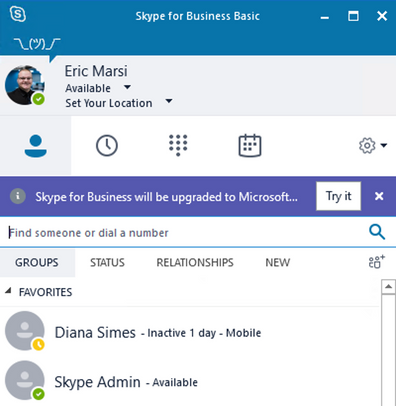
Users will now see the following message in the Skype for Business client:
The Migration Process
Migrate Exchange UM Auto Attendants/Interactive Response Groups to Cloud AA
One of the first steps of the migration process involves moving away from both Exchange UM Auto Attendants and Interactive Response Groups and moving these services to Cloud Auto Attendants. While users that are on premises cannot be added to these groups (in this configuration where SFB Server is going away) until they are moved to the cloud, having the group created and in place, makes the migration much easier once the users have been migrated to the cloud.
Steps:
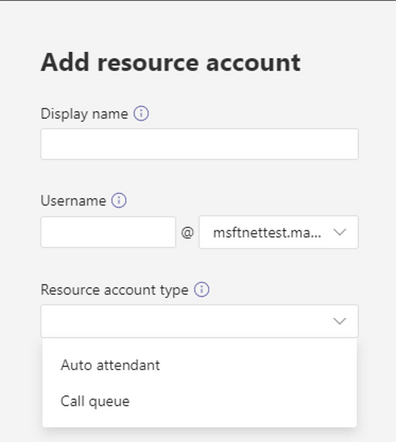
1. Create a Resource Account and Assign a Virtual Phone System User to that Account
- In the Teams Admin Center, navigate to Org-Wide Settings and then Resource accounts
- Create a new account, set an account name, and then set the account type to Auto Attendant
- NOTE: If you are planning to keep SFB Server, a Resource Account needs created on SFB Server and synced to Microsoft 365 to handle routing: https://docs.microsoft.com/en-us/skypeforbusiness/hybrid/configure-onprem-ra
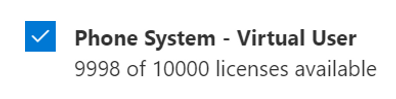
2. Assign the resource account a Virtual Phone System License in the Microsoft 365 Admin Center (You may need to “purchase” this free license)
3. Return to the Teams Admin Center and open the AA wizard and assign the Resource Account
- Design the AA based off your needs
4. Connect to a SFB Online PowerShell to assign a on-prem DID (If using Direct Routing)
- Set-CsOnlineApplicationInstance -Identity OH1_RA_AA1@msftnettest.co -OnpremPhoneNumber +13305768173
• Not all features are 1 for 1 as previous solutions – New Features Coming Soon
- Transfer calls to the PSTN from auto attendant and call queues
- Voicemail shared mailbox for auto attendant and call queues
- Extension dialing from AA
Migrate Hunt Group Response Groups to Cloud Call Queues
After the Exchange UM Auto Attendants and Interactive Response Groups have been migrated, we now need to move our Hunt Group Response Groups to the cloud. The below steps are very similar to the previous steps with a few minor changes.
Steps:
1. Create a Resource Account and Assign a Virtual Phone System User to that Account
- In the Teams Admin Center, navigate to Org-Wide Settings and then Resource accounts
- Create a new account, set an account name, and then set the account type to Call Queue
- NOTE: If you are planning to keep SFB Server, a Resource Account needs created on SFB Server and synced to Microsoft 365 to handle routing: https://docs.microsoft.com/en-us/skypeforbusiness/hybrid/configure-onprem-ra
2. Assign the resource account a Virtual Phone System License in the Microsoft 365 Admin Center (You may need to “purchase” this free license)
3. Create a Office 365 group or distribution list of the users that are to have membership within the call queue.
4. Return to the Teams Admin Center, navigate to Voice then Call Queues and create a new cloud call queue.
- At the beginning of the setup, select the Resource Account and select the previously created distribution group
- Configure the options to match previous RGS configuration
5. Connect to a SFB Online PowerShell to assign a on-prem DID (If using Direct Routing)
- Set-CsOnlineApplicationInstance -Identity OH1_RA_CQ1@msftnettest.co -OnpremPhoneNumber +13305768174

Migrate Shared Line Appearances (SLA’s)
If you have any SLA’s setup for things such as retail stores, an individual user account needs to be created, setup like a standard user, and then have its delegates set inside the Microsoft Teams Application or via the Teams Admin Center. This will allow the user to make calls on behalf of the retail store. For more information regarding SLA’s CLICK HERE. Follow the below steps to setup delegates for a user in the Teams Admin Center:
Steps:
1. Create a user and either assign a calling plan license or enable the user for Teams Direct Routing.
2. Login to the Teams Admin Center, navigate to Users > Select a User > Voice.

3. Scroll down to Call Delegation > Add People.

4. Add all users that should be part of this group and click Save.
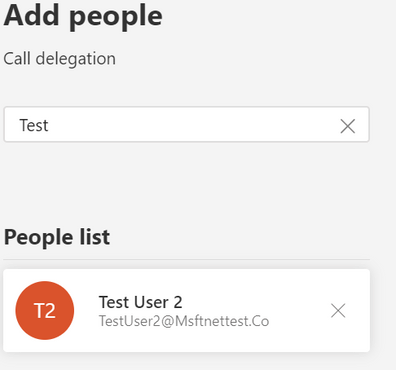
5. The users will now have delegate access to the user.

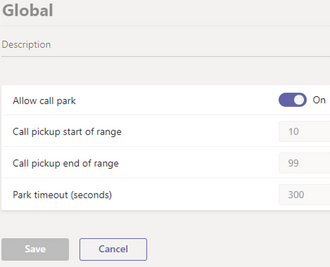
Enable Call Park (Optional)
The Call Park service allows users to temporarily park a call and resume the call from another user’s account. While this feature is optional, it is highly recommended to deploy it especially if call park was already deployed on Skype for Business Server.
Steps:
1. Login to The Teams Admin Center
2. Expand Voice > Call park policies
3. Modify or create a policy that fits your environment (Global in this case)
4. Click the toggle switch to “Allow call park”
5. Define a range
- 10-99 in this case
6. Click Save
User Migration
The fun portion begins 🙂 Make sure that users are notified once more about the migration, schedule a maintenance window, and begin the migration with a pilot group of users of whom you wish to migrate to Microsoft Teams first.
Steps:
1. Connect to a Skype for Business Front-End Server and open the SFB Control Panel
- If you are using the 2019 Modern Control Panel (MACP), CLICK HERE for a step-by-step guide.
2. Navigate to Users & click then click “Find”
3. Select the users that are part of this pilot group (Hold CTRL Key), click “Action” then “Move Selected Users to Teams…”
4. When prompted, sign into Microsoft 365 with a .onmicrosoft.com admin account
5. After signing in, click OK and the users will be migrated

At this time, the user’s client will sign out and attempt to sign back in. When the affected user(s) attempt to sign into Skype for Business, a modern login will appear and once signed in, a prompt stating that your organization is now using Microsoft Teams will appear. The Skype for Business client will remain signed in so that the ability to join Skype for Business meetings will still continue to work without the need of the Skype Meetings app. This is shown below:
Additionally, any meetings previously scheduled in Skype for Business will be converted to Microsoft Teams Meetings via the Meetings Migration Service (MMS) in about 90 minutes in the background.
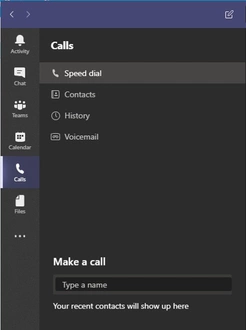
You might be thinking that since the users are migrated now, everything is fine right? This is not the case as the user is missing all enterprise voice features (Not the case in the event that a Calling Plan was assigned to the user in Microsoft 365) This can be seen in Microsoft Teams as there is no dial pad under the Calls tab for the user. The next steps involve us enabling the user for Enterprise Voice, Cloud Voicemail, and assigning a voice policy. Note that this has to be done via PowerShell and not via the Teams Admin Center GUI (Features no yet implemented).
Steps:
1. Connect to Skype for Business Online PowerShell via standard authentication or multi-factor authentication
Connect-MicrosoftTeams2. Enable the users for Enterprise Voice and Cloud Voicemail
- Set-CsUser -Identity “<User Name>” -EnterpriseVoiceEnabled $true -HostedVoiceMail $true
- Set-CsUser -Identity “Test User 1″ -EnterpriseVoiceEnabled $true -HostedVoiceMail $true
- Note: There is a chance you may have to use the DN of the user instead of the name. Use the following cmdlet to retrieve this!
• Get-CsOnlineUser | select Alias,DistinguishedName
- To find all users that have been migrated and to view what settings are set for them, run the following command:
- Get-CsOnlineUser | Where-Object {$_.TeamsUpgradeEffectiveMode -eq “TeamsOnly”} | Where-Object {$_.OnPremHostingProvider -eq “sipfed.online.lync.com”} | select Identity, DisplayName, OnPremLineURI, HostedVoiceMail, EnterpriseVoiceEnabled

3. Assign a previously defined Voice Policy to the user
- Grant-CsOnlineVoiceRoutingPolicy -Identity “TestUser1@msftnettest.co” -PolicyName “OH1”
Now that these settings have been configured, the user(s) will now have a dialpad and be permitted to make calls. Note that these changes can take up to an hour to replicate across Microsoft’s cloud.

Device Firmware Upgrades/Changes
With users now fully homed and operational on the new service, their devices and associated software needs to be updated to support the features of Microsoft Teams. Follow the below steps for each category of devices
Deploy the native Microsoft Teams firmware for desk phones & conference phones
- AudioCodes C450HD (Flip of a toggle in the phone settings)
- Crestron Flex UC-P100/P110-S/T
- Yealink T55A/T56A/T58A/CP960
- Poly Trio 8500/8800 – Not Native
Non-native Skype for Business Certified desk phones (3PIP) will continue to work until 2023
- Lync Phone Edition Devices will not work (CX600)
Microsoft Teams Rooms (MTR) (Formerly Skype Room Systems (SRS))
- Firmware is already up to date
- Need to change default mode on the console to use Microsoft Teams instead of Skype for Business via the local app settings or remotely
Busylight and Blynclight software upgrades
- Needs to be updated to utilize Teams for presence
Testing & Validation
The goal of the testing & validation phase is to determine if the requirements that were outlined in the Functional Validation Testing (FVT) document have been met. This is to ensure that all features are working correctly. Some examples of items that are included in the FVT are as follows:
- AA Call – Each menu option | Calls to users/Call Queues internally/externally
- External federation
- Voicemails routing to cloud voicemail
- Caller-ID
- Phone Calls are working
Ask yourself, “Did I meet my Teams success criteria?”
Clean-Up
SBC Reconfiguration
Once all the users have been migrated to Microsoft Teams, the SBC needs to be reconfigured as it no longer needs to route to Skype for Business. In the event that a calling plan is being used and no on-premises infrastructure is required, the SBC can be shut off and any service from a service provider can be canceled. In the event that a SBC is required for Direct Routing, The following needs to be completed:
Anynode SBC reconfiguration
- Remove references to Skype for Business from the Routing Domain
- Remove the Skype for Business Node
- Clean up any route filtering
- This environment had two DID’s mapped just to Microsoft Teams before the migration for testing, remove this filter.
AnyNode SBC Configuration Before:

AnyNode SBC Configuration After:

Skype for Business Server Retirement
The following steps are to be completed to fully remove Skype for Business Server from the environment:
1. Ensure that all users are removed from Skype for Business Server. Use the following cmdlet to find all users still on-premises:
- Get-CsUser | Where-Object {$_.RegistrarPool -ne $Null} | select DisplayName,RegistrarPool
2. Update external DNS records to point to Microsoft 365
- Run a “Check DNS” Test in the M365 Portal to determine which ones need changed
- Delete all unneeded records
- meet. | dialin. | skypeweb. | skypeadmin. | ucupdates-r2.
3. Update internal DNS records in the event of a split-domain topology
- Delete all unneeded records
4. Disable SharedSipAddress space in the cloud
- Connect to Skype for Business Online and run the following cmdlet:
- Set-CsTenantFederationConfiguration -SharedSipAddressSpace $False
4. Delete Attributes and shared configuration
- Run on a local Front-End Server:
- Get-CsUser | Disable-CsUser
5. Remove the deployment in Topology Builder then publish this topology (Action menu)
6. Remove the Conference Directory
- Get-CsConferenceDirectory | Remove-CsConferenceDirectory
7. Finalize the uninstall – Can use this or the deployment wizard on ALL servers
- Publish-CsTopology -FinalizeUninstall
8. Remove the configuration store location from active directory
- Remove-CsConfigurationStoreLocation
9. Un-prep the local domain and forest
- Disable-CsAdDomain -Domain contoso.com -GlobalSettingsDomainController MSFTT-DC1.msftnettest.co -Force
- Disable-CsAdForest -Force -GroupDomain msftnettest.co
Clean Up – Additional Items
- Remove DHCP options
- Internal documentation
- Firewall rules
Troubleshooting
Some issues may occur during the deployment. Below are a few that may occur with their solutions. (I will try and keep this list updated if/when issues occur)
The error: “Policy “OH1″ is not a user policy. You can assign only a user policy to a specific user” appears when assigning a newly created Voice Policy to a user
Due to the speed in which Office 365 replicates changes in the backend, there may be a bit of a delay when creating a new voice policy. Ignore this, go do something else, come back in 30 minutes, and retry the process again.
Unable to set the domain of a resource account created in the cloud to my primary domain
Due the SIP CNAME record pointing to the on-premises edge, the Teams Admin Center will now prevent you from using your primary domain as it wants this account created on-premises. In order to bypass this, you can either temporarily change the DNS record to the one provided by Microsoft, or just simply set the account to an un-preferred domain then change the sign in address of the account in the Microsoft 365 Admin Center.
Special Thank You!

I want to give a special thank you to anynode for giving me a license to use their SBC for this guide. Be sure to check out their amazing product at https://www.anynode.de/
Skype for Business Server has now been decommissioned and all users are now using Microsoft Teams. Feel free to reach out by commenting below if you have any questions!

1 comment so far